Recently, I learned how to create a new header for my blog. I couldn't believe how easy it was and by request, I am going to show you how too.
Most blog headers are purchased or created with expensive software programs like photoshop. I don't own photoshop, so I was thrilled to learn that all I needed, to make my blog header was
Picasa. It's easy, it's free and I already use it everyday! If you don't have it, just click on the link I provided and download it ASAP! For some reason, it will only let me access the download websites for mac, I guess because I use a mac. If you use a PC just google picasa and it will pop right up.
Okay, now that you have Picasa downloaded, lets get started...
Picasa should automatically upload the pictures on your computer. Your screen should look something like this.
Select one image and click the collage button at the bottom of the screen. That will take you to this screen.
If you look to the left of the screen you will see the options to change the background color, and add borders to your pictures. You can do that now or at any time before you "create collage". We will get to that in a bit. You can see in the picture below that I changed the background color here. I should also mention, that you can download digital scrapbook paper and have even more options for backgrounds. I know there are a few websites that offer free downloads! But, for this tutorial, I am staying simple and just changing the color.
Add other pictures from clips, or you can go back to My Library and add pictures that way. You can select each individual picture to adjust the size and also rotate it, or you can select all of the pictures and adjust the size at the same time. Either way, use the gray circle to adjust size and rotate. You can see in this picture I have all of my pictures selected and I'm changing the size all at once.
Once you have added all your pictures, move them to the top half of the screen. This is an important step, so don't skip it. :)
Once you have the pictures arranged exactly as you want them, click on the create collage button under the settings tab. This will take just a few seconds.
Now it's time to add some text. Under the basic fixes tab, select the text icon and click anywhere on your collage where you want to add your blog name. You can change the color, size and font. So, that means that you can use any font on your computer. I am constantly adding new fonts to my computer. One of my favorite websites for fonts is
fonts for peas. This website turns your own handwriting into computer and scrap booking fonts! I love this! They have TONS of free fonts. Definitely worth visiting!
Once you have your text just right, select apply under basic fixes tab. You can add more text if you want to add the date or month to your header or even a quote. Just make sure to hit apply to save your work.
The last step is to crop. This will make it look long and slender like a header instead of boxy like a picture. Under basic fixes select crop.
Then select apply.
You are done! All that is left now is exporting it and uploading it to your blog. So click the export icon at the bottom of the screen. This screen will appear. (
I changed headers here. Don't let it confuse you. :)
You will want to name your file and send it to your picture files. The only other thing you might want to adjust is the pixels. This determines the width of your header. If you have a wide blog layout you can possibly use higher pixels. For my blog, I use 920 pixels. Try this first. I will show you in a bit how to readjust this if it is too wide or not wide enough.
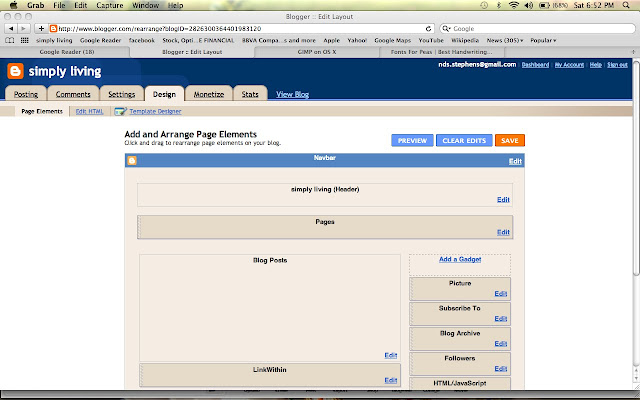
Now, go to your blog and click on the design tab. Click edit under the header section. This is where your blog name is listed.

Under placement, click
Instead of title and description. Then, choose your file. When your header image appears, click save.
Doing that, will take you back to the design section. You will want to preview your header before you save and officially change your header. Make sure the header is wide enough, but not so wide that part of it is chopped off and not visible. If you need to make adjustments, go back to picasa and try to export the file again. This time adjust the pixels to the width of your blog template. If it was too wide and part of your header was not showing, try lowering the pixels just a bit. Raise the pixels if it was too short.
If yours was just right the first time, click save and go view your blog! You did it! :)
There are unlimited options to creating your header. I first saw this idea on
clover lane. She has a wonderful tutorial and there are lots of other great ideas you might find on her site. Here are a few examples of headers that I have made recently.
Please let me know if you use this tutorial. I would love to see what your blog headers look like!


