Pages

Sunday, January 30, 2011

birthday brownies


This post is coming to ya a bit late, but, it was a special time and deserves a shout out! Last weekend, we got together with my side of the family and celebrated Jess's birthday. The celebration its self was late. We've had a hard time getting all of us together, even though we live in the same town. So last weekend, when we were all free, we decided to get together for a birthday bash.

Jess loves Ghirardelli brownies, so we decided to have those instead of cake. We are always trying to be creative with birthday desserts. When your family celebrates a birthday almost every single month out of the year, birthday cake gets a little old. 

We didn't think too far ahead and didn't realize our tall candles would lean every which a way!


But, that was okay, we still sang and jess was still able to blow her birthday candles out.


Happy birthday Jess! Your brownie birthday bash was a blast! Can't wait till you are officially a part of the family, even though we already consider you a part. :)

Friday, January 28, 2011

5 sweet years and counting

I hope this post isn't too personal for any of you reading. Normally, I am not one to publicly announce my forever love to my husband. I usually keep that between us. I am not a romantic, I tend to be more of a realist. But, I am just bubbling over with gratitude for him, and so thankful to God that He placed Jeremy in my life; to walk beside me, until we leave this earth. And he really is so good to me, he deserves to be bragged on every now and then.


Happy 5 year anniversary to my very best friend and precious husband! I had no idea 5 years would fly by so quickly. Sometimes, I wonder why in the world God blessed me with someone like you. You are patient, caring, loving and always put your family first. I am so thankful for you and treasure every moment we spend together, even the lazy nights, spent laying around at home in our pj's. When we were 14 and in our very first year of high school, I had no idea what a jewel I had found. But, now I know and I couldn't be happier. Looking back on high school, college, our days in Birmingham and at UAB, buying our first home and having our first baby, I can see how much God has blessed me and I am so thankful that he knew I needed you. We have basically grown up together and I am looking forward to growing old together (not any time soon though, I am enjoying right where we're at ;). Thank you for encouraging me, loving me when I am a bit unlovable and leading our family in such a Godly way. This means everything to me. I am having the time of my life and looking forward to many, many, many more fabulous years with you!! I love you. more than my words can say.


(Sorry about the random wedding pictures. These were basically the only two I could find on my computer, and I didn't get  a chance to upload our professional ones.)

Wednesday, January 26, 2011

a simple applique


Finally, after almost an entire month, I found the time to open my sewing machine that Jeremy gave me for Christmas. I have been so excited about this gift, I just haven't had the time to open it! I've been telling him, basically since we got married, (which happens to be 5 years ago this Friday!) that I would really like a sewing machine. So, you can imagine I was thrilled when I received one. I knew exactly what I wanted to do for my first project....an applique for Ella Claire and her two cousins. And with Valentine's just a few weeks away, I thought it would be great to make something to celebrate the month of love. :)

I have stumbled across tons of applique tutorials online, but I found this one and this one to be the most helpful with exactly what I wanted to do. Yes, that is another link to flythroughourwindow. I told you it's one of my favorites! :) 
To get started you will need:
-fabric(s)
-thread in matching or coordinating colors
-shirt or onesie
-heat n bond (I'm going to shorten this to HnB just for the sake of me not typing it 1 million times)
-stabilizer
-spray on adhesive
-iron
-sewing machine

I learned a lot along the way. As I go, I'll share little tips and tid bits that helped me, or that I will know to do next time. First step, is print out or draw your design in a "mirror image" aka backwards. I knew I wanted an "E", an "M" and a heart background. I found the font online that I wanted and just free handed the heart. 

Next, trace your design onto the paper side of the HnB. Remember, you will be looking at a mirror image.

Iron HnB with letter to the wrong side of your fabric. 

Cut out your letter.

Iron "heart" shape HnB to wrong side of fabric.

Cut out your heart. Mine wasn't perfectly even and that bothered me. So, I folded it together and trimmed the sides. 

Remove the HnB paper from the letter, center the letter onto your heart fabric and iron. My "letter" fabric was a lighter shade pink than my "heart" fabric. It was also thinner fabric. Next time, I will go with a thicker fabric, just to make sure you can't see through the "letter" fabric. Does that makes sense?

Here comes the fun part...sewing! Zig zag stitch around your letter. Because this was my first time sewing with my new machine; I traced my letters onto scrap fabric and practiced sewing each letter before I actually sewed my applique. I'm so glad I did this because I had no idea those letters were going to be so difficult to sew. I'm sure the more I do this the easier it will get, but it you are new to sewing or just rusty because you haven't done it in a while, I would recommend sewing a few practice letters first. Also, in one of the tutorials I mentioned above, Darby shares that she changed the width and length of her stitches. I also changed mine to her settings for the letters, width 1.8 and length .5.

***this is where my pictures stop for the tutorial. I did this late one night last week after Ella Claire went to bed. As it got later, I got sleepier and I totally forgot to take pictures at each step. :/ ****

Peel HnB from back of heart, center on shirt and iron.

Attach stabilizer to back of shirt with spray adhesive. Make sure the stabilizer is directly under your design.

Sew around heart. I sewed Ella Claire's onesie first because I still wasn't confident and didn't mind if hers was less than perfect. After I sewed Ella Claire's I didn't like the skinny width of the stitch on the heart as much as I liked it on the letter. So, for the other 2 shirts, I changed my width to 5.0 and kept the length at .5, just when sewing the heart. 

And that's all there is to it! Definitely the most difficult part for me was sewing around the little bubbles on my fancy letters. If you are a beginner sewer like me, you can always use straight letters without a lot of curve. Those would be much easier!


Here are the appliques for Emma and Madelaine. All wrapped up and ready for Ella Claire to hand out! :) 

I really hope someone finds this helpful. It was such a fun project with such cute results. If you happen to try it, let me know. I would love to see your applique. Also, feel free to leave me any tips! :)

Friday, January 21, 2011

some VERY GOOD news!

First of all, thank you so very much for all the kind words of encouragement this week! I appreciate all of the prayers! Ella Claire is still hanging in there and has not started wheezing or given me any indication that we need to go back to the doctor. Please keep praying though, because, I know this virus peaks at around 5 days (we are at day 3) and has the potential to be very mean to young children!

This week started off rough, but it has ended well!!! You will never guess who is back.....our GUS GUS!!!! It just so happens that Gus was not a good fit for the other family and we could not be happier about that! The very short time he was gone...about 24 hours, Jeremy and I were just so sad and questioning if we had made the right decision. The couple called Jeremy and me around 4 o'clock on Thursday and said that he was just a little too hyper for them and tinkling all over their house (which I guess he was doing that because he was in new territory, because he is completely house broken and NEVER goes potty in our house). So they brought him back home and we have been one little happy family since. Now, we still have to handle the behavioral issues, so we will now be going to plan b: obedience school. We probably should have tried this first anyway, it sounds like a much better plan!! Don't ya think? 

Okay, because I am so glad that Gus is home, I have to show you something funny he did tonight. Jeremy and I have this chair in our bedroom and Gus likes to sit in it. I have been a laundry washing machine tonight, but not a laundry folding machine, :) and I decided to just put a pile of clean laundry in our chair and fold them tomorrow. Gus, didn't mind that there was laundry in his chair, he just climbed right on top. Ordinarily, I would not let Gus lay on our clean laundry, but because we tried to give him away this week, he might just be getting a little special treatment for the next few days week or so. :) So, I came back to our chair with another load of clean laundry and told Gus to move and tried to make him move, but he decided he wasn't going to; so, I just put the load on top of him. :)
(pardon the grainy picture, taken in a dimly lit room with my iPhone)

He didn't seem to mind at all, probably because they were nice and warm. Actually, that sounds kinda nice... I wish someone would cover me in warm clean clothes straight out of the dryer!!! Anyway, that was about 2 hours ago. I just looked over at Gus (Yes, I'm typing this from my bed at 10:30 pm on a Friday night... it's been a long week remember???), and this is what I found.
(same photo disclaimer as above ;)

Yes, sound asleep. Out cold. I think he likes it in there. Don't think he can't get out; I have seen him wiggle and reposition a few times.

Okay, I gotta run, my eye lids are heavy. But, I do want to show you a sneak peak of something I made yesterday with my new sewing machine that J gave me for Christmas.

I appliqued this onesie for EC for Valentine's. I am so excited about it! This is literally the first thing I have sewn besides an a-line dress about 3 years ago, at a beginner's sewing class. But that was so long ago, it doesn't count. That should tell you how easy this project was! Just in case you might want to make one too, I wrote down all the steps and took pictures as I went so I could show you how to make one too. That post should be coming up soon. Shhh! Don't tell, but Ella Claire is giving one to her cousins Emma and Madelaine for Valentines. :) Can't wait!!

Okay, I'm out! Hope you have a WONDERFUL weekend!!! 

Thursday, January 20, 2011

a sick baby and farewell to an old friend


Today has not been an easy one. Ella Claire didn't sleep well last night and woke up with a runny nose. After a short trip to the doctor's office we found out she has RSV. :( We know exactly where she got it; poor little Madelaine has been sick with it for a week now. She is having to have breathing treatments around the clock and is thankfully doing better.  Kim took M to the doctor last Wednesday, but she was not diagnosed with RSV until she went back to the doctor's office on Sunday. So Ella Claire was exposed to it sometime last week and just started showing symptoms today. We left the doctor's office with no medicine, were told that it just has to run its course and she could possibly have a mild case (we are praying!!!). We will know in 5 days when it should peak. Supposedly, each child reacts differently to it and some do not need breathing treatments. Please pray with us that EC's symptoms will not get any worse! However, in the mean time we will be hanging out at home. We were told to stay home and for Ella Claire to not be around any children for eight days. We will certainly take the advice as we do not want to spread this yucky bug around!


On another note, we feel like we lost a member of our family today. We DID loose a member of our family today. Jeremy and I decided recently that we had to find a new home for Gus. :( Unfortunately, since Ella Claire has been here, we have not been able to give Gus the attention that he needs, loves and desires. Because of this, he has become a bit naughty. By naughty, I mean barking constantly, chewing on Ella Claire's toys and just plain ignoring when we tell him to stop or give him a command. We know that his behavior is directly related to the lack of attention we are able to provide.

Jeremy found him a wonderful new home and we know he will be treated extremely well!!! We are just giving this a trial run and if Gus doesn't do well with the new family, or if we are just too sad and have a change of heart, over the next week or so we can get him back. But, we know this will probably be permanent.

I am sad because Jeremy and I got Gus 4 years ago when we lived in Birmingham and he really is a part of our family. I am sad because Ella Claire loves Gus too. I am sad because it feels like something is missing without him here. I am sad because I thought Gus would be around and with us as Ella Claire and our future children got older. This probably sounds very silly to someone who doesn't have a dog or an inside dog, but believe me when I say, we all moped around this house tonight missing our little pup. I'm just trying to remind myself of all the new things and love he will receive at his new home.  :)

So, hopefully tomorrow will be a brighter day. I will be doing just as the nice lady that took Gus tonight said I could, and call and check on him first thing in the morning. But for now, a trip down memory lane...

The day we brought him home to our apartment


moving home from Birmingham


Gus helping me drive


buddies right from the start


Good night friends, it's been a long day!

Wednesday, January 19, 2011

Tuesday, January 18, 2011

making a blog header...a tutorial

Recently, I learned how to create a new header for my blog. I couldn't believe how easy it was and by request, I am going to show you how too.

Most blog headers are purchased or created with expensive software programs like photoshop. I don't own photoshop, so I was thrilled to learn that all I needed, to make my blog header was Picasa. It's easy, it's free and I already use it everyday! If you don't have it, just click on the link I provided and download it ASAP! For some reason, it will only let me access the download websites for mac, I guess because I use a mac. If you use a PC just google picasa and it will pop right up.

Okay, now that you have Picasa downloaded, lets get started...

Picasa should automatically upload the pictures on your computer. Your screen should look something like this.


Select one image and click the collage button at the bottom of the screen. That will take you to this screen.


If you look to the left of the screen you will see the options to change the background color, and add borders to your pictures. You can do that now or at any time before you "create collage". We will get to that in a bit. You can see in the picture below that I changed the background color here. I should also mention, that you can download digital scrapbook paper and have even more options for backgrounds. I know there are a few websites that offer free downloads! But, for this tutorial, I am staying simple and just changing the color.


Add other pictures from clips, or you can go back to My Library and add pictures that way. You can select each individual picture to adjust the size and also rotate it, or you can select all of the pictures and adjust the size at the same time. Either way, use the gray circle to adjust size and rotate. You can see in this picture I have all of my pictures selected and I'm changing the size all at once.


Once you have added all your pictures, move them to the top half of the screen. This is an important step, so don't skip it. :)


Once you have the pictures arranged exactly as you want them, click on the create collage button under the settings tab. This will take just a few seconds.


Now it's time to add some text. Under the basic fixes tab, select the text icon and click anywhere on your collage where you want to add your blog name. You can change the color, size and font. So, that means that you can use any font on your computer. I am constantly adding new fonts to my computer. One of my favorite websites for fonts is fonts for peas. This website turns your own handwriting into computer and scrap booking fonts! I love this! They have TONS of free fonts. Definitely worth visiting!

Once you have your text just right, select apply under basic fixes tab. You can add more text if you want to add the date or month to your header or even a quote. Just make sure to hit apply to save your work.

The last step is to crop. This will make it look long and slender like a header instead of boxy like a picture. Under basic fixes select crop.

Then select apply.

You are done! All that is left now is exporting it and uploading it to your blog. So click the export icon at the bottom of the screen. This screen will appear. (I changed headers here. Don't let it confuse you. :)


You will want to name your file and send it to your picture files. The only other thing you might want to adjust is the pixels. This determines the width of your header. If you have a wide blog layout you can possibly use higher pixels. For my blog, I use 920 pixels. Try this first. I will show you in a bit how to readjust this if it is too wide or not wide enough.

Now, go to your blog and click on the design tab. Click edit under the header section. This is where your blog name is listed.


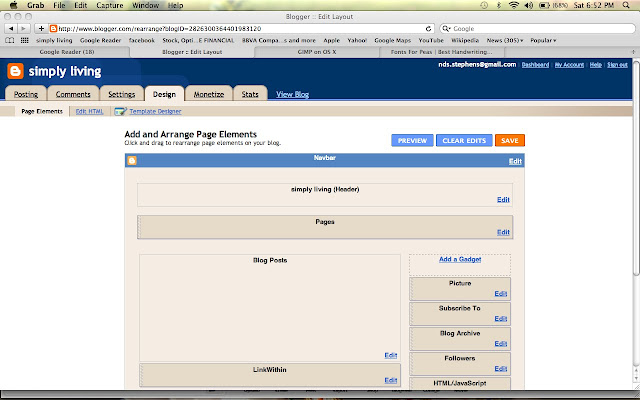
Under placement, click Instead of title and description. Then, choose your file. When your header image appears, click save.

Doing that, will take you back to the design section. You will want to preview your header before you save and officially change your header. Make sure the header is wide enough, but not so wide that part of it is chopped off and not visible. If you need to make adjustments, go back to picasa and try to export the file again. This time adjust the pixels to the width of your blog template. If it was too wide and part of your header was not showing, try lowering the pixels just a bit. Raise the pixels if it was too short.

If yours was just right the first time, click save and go view your blog! You did it! :)

There are unlimited options to creating your header. I first saw this idea on clover lane. She has a wonderful tutorial and there are lots of other great ideas you might find on her site. Here are a few examples of headers that I have made recently.


Please let me know if you use this tutorial. I would love to see what your blog headers look like!
Related Posts Plugin for WordPress, Blogger...